
Easy Gluten-Free Brioche Recipe
Introduction
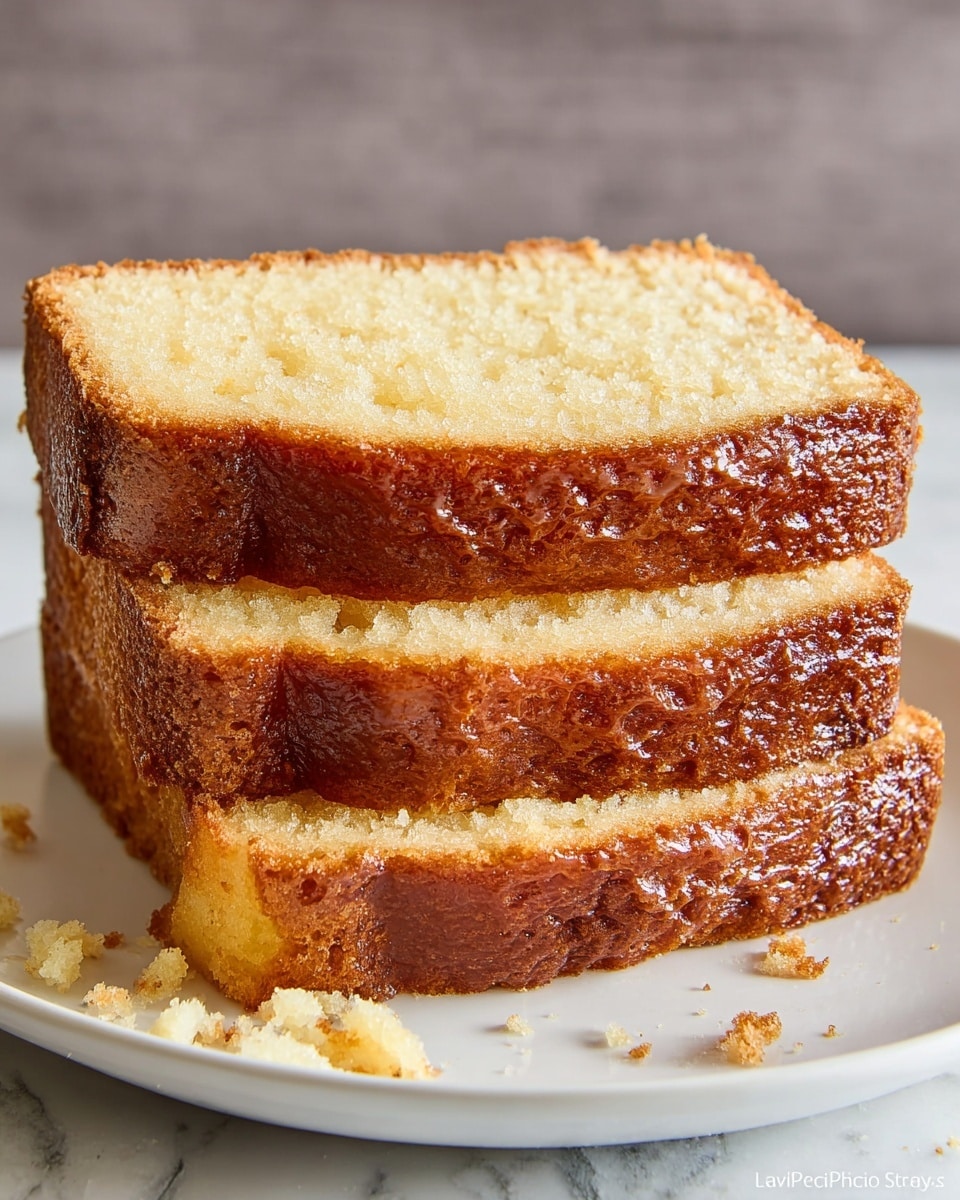
This easy gluten-free brioche recipe delivers a soft, buttery loaf that’s perfect for breakfasts or special treats. With just a few simple steps, you can enjoy the rich texture of brioche without gluten. It’s an ideal choice for those seeking a comforting homemade bread that everyone can enjoy.
Ingredients
- 2/3 cup milk or non-dairy milk (see note)
- 2 1/2 teaspoons dry active yeast (one packet)
- 1 tablespoon cane sugar
- 2 3/4 cups gluten free flour blend (see notes)
- 1/4 cup cane sugar
- 1 teaspoon sea salt
- 3 large eggs
- 1/2 cup melted unsalted butter
Instructions
- Step 1: In a small bowl, heat the milk to about 110º F—this takes approximately 25-30 seconds in the microwave. Stir in 1 tablespoon cane sugar and the dry active yeast. Let it sit for 5-10 minutes until the mixture becomes frothy. Be careful not to overheat the milk or it may kill the yeast.
- Step 2: Attach the paddle to your stand mixer. Add the eggs and melted butter to the mixer bowl and beat on low for 30 seconds. Then add the gluten-free flour blend, sea salt, cane sugar, and the frothy yeast mixture.
- Step 3: Mix on low speed, gradually increasing as the flour incorporates. Once the dough forms, stop mixing—avoid overmixing. Note that gluten-free dough typically only rises once.
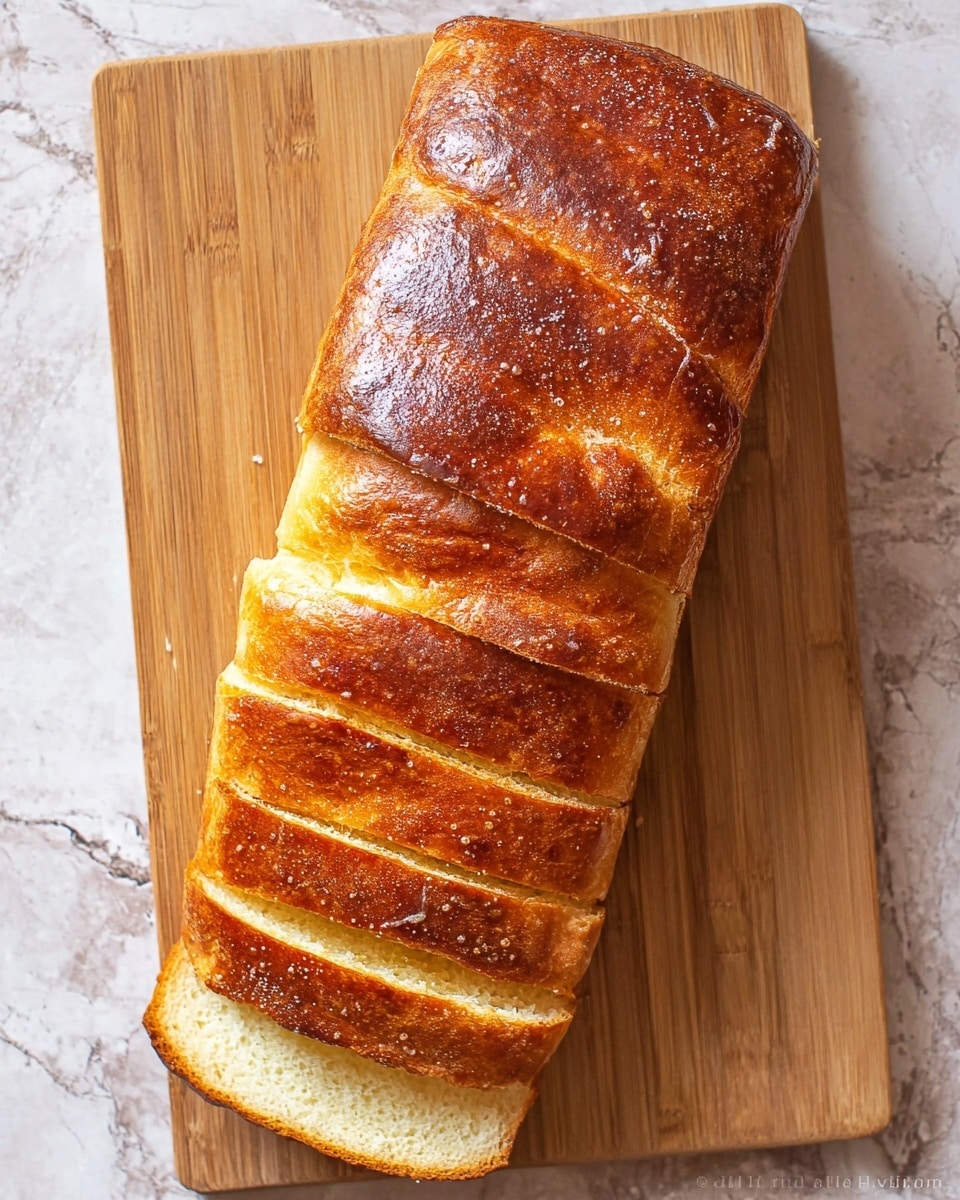
- Step 4: Transfer the dough onto a silicone mat or a clean surface. Gently shape it into a ball without adding extra flour (if using the recommended flour blend). Divide the dough into two equal pieces and roll each into ropes matching the length of your loaf pan. Optionally, you can braid three strands for a different look.
- Step 5: Grease your loaf pan. Preheat your oven to 175º F and position the rack in the middle. Once reached, turn off the oven.
- Step 6: Twist the two dough ropes together and place them inside the pan. Cover with plastic wrap and place in the warm oven with the door slightly open or another warm spot to rise until doubled in size.
- Step 7: After rising, preheat the oven to 350º F. Beat an egg in a small bowl and brush it over the top of the loaf twice for a deep golden color.
- Step 8: Bake the brioche for 30-40 minutes, until the top is golden brown and the internal temperature reaches 190º F. Use a digital thermometer inserted deep in the loaf to check doneness.
- Step 9: Remove the bread from the oven and let it cool in the pan for 5 minutes. Carefully transfer to a wire rack to cool completely. For best results, wait at least 2 hours before slicing to allow the bread to set.
Tips & Variations
- Use room temperature eggs for easier mixing and better texture.
- If you prefer, substitute non-dairy milk like almond or oat milk to keep the recipe dairy-free.
- Try adding a teaspoon of vanilla extract or orange zest for a subtle flavor twist.
- Use a digital thermometer to ensure the brioche is perfectly baked through, avoiding undercooked centers.
Storage
Store the brioche in an airtight container at room temperature for up to 2 days. For longer storage, wrap tightly in plastic wrap and freeze for up to 1 month. To reheat, thaw at room temperature and warm in a low oven (about 300º F) for 10-15 minutes to refresh the crust and softness.
How to Serve
Serve this delicious recipe with your favorite sides.
FAQs
Can I use instant yeast instead of active dry yeast?
Yes, you can substitute instant yeast. Use slightly less (about 2 teaspoons) because instant yeast is more concentrated and does not require proofing.
Why does gluten-free brioche only rise once?
Gluten-free dough structures are more fragile and do not develop the elasticity found in wheat doughs, so they typically only support one rise to maintain the best texture.
PrintEasy Gluten-Free Brioche Recipe
This easy gluten-free brioche recipe offers a rich, buttery bread substitute perfect for anyone avoiding gluten. Made with a specialized gluten-free flour blend, eggs, and melted butter, this brioche is tender and slightly sweet with a golden, glossy crust achieved through an egg wash. Ideal for breakfast or sandwiches, it includes clear steps for activating yeast, preparing the dough, shaping, rising, and baking to perfection.
- Prep Time: 15 minutes
- Cook Time: 35 minutes
- Total Time: 2 hours 50 minutes (including rising and cooling)
- Yield: 1 loaf (about 8 slices) 1x
- Category: Bread
- Method: Baking
- Cuisine: French
- Diet: Gluten Free
Ingredients
Yeast Mixture
- 2/3 cup milk or non-dairy milk
- 2 1/2 teaspoons dry active yeast (one packet)
- 1 tablespoon cane sugar
Dough
- 2 3/4 cups gluten free flour blend
- 1/4 cup cane sugar
- 1 teaspoon sea salt
- 3 large eggs
- 1/2 cup melted unsalted butter
For Egg Wash
- 1 egg (scrambled)
Instructions
- Activate the Yeast: Heat 2/3 cup milk or non-dairy milk to 110ºF (about 25-30 seconds in microwave). Stir in 1 tablespoon cane sugar and 2 1/2 teaspoons dry active yeast until mixed well. Let sit for 5-10 minutes until frothy, ensuring the milk isn’t too hot to avoid killing the yeast.
- Mix the Dough: Attach paddle to a stand mixer. Beat 3 large eggs and 1/2 cup melted unsalted butter on low for 30 seconds. Add 2 3/4 cups gluten free flour blend, 1 teaspoon sea salt, and 1/4 cup cane sugar to the bowl, then pour in the frothy yeast mixture. Mix on low, gradually increasing speed as flour is incorporated. Stop mixing once dough forms; avoid overmixing.
- Shape the Dough: Transfer dough onto a silicone mat or clean surface. Gently form it into a ball without adding extra flour. Divide the dough into two equal pieces and roll each into ropes matching the length of your loaf pan. Optionally, braid into three strands if preferred.
- First Rise: Grease a loaf pan. Preheat oven to 175ºF and move rack to middle. When temperature is reached, turn oven off. Place twisted two ropes into the pan, cover with plastic wrap, and place in the warmed oven with door slightly ajar or in another warm spot to rise until doubled in size.
- Prepare for Baking: Once risen, preheat oven to 350ºF. Beat one egg and brush it generously over the loaf surface twice to create a deep golden crust.
- Bake the Brioche: Bake for 30-40 minutes until the top is golden brown and internal temperature reaches 190ºF, measured with a digital thermometer inserted to the bottom of the loaf.
- Cool the Bread: Remove loaf from oven and let it sit in pan for 5 minutes. Then, transfer to a wire rack to cool completely. Avoid slicing for at least 2 hours to allow bread to set and finish cooking internally.
Notes
- Use the same gluten-free flour blend throughout to maintain dough consistency.
- Ensure milk temperature does not exceed 110ºF to avoid killing yeast.
- Gluten-free dough only gets one rise; handle gently.
- Double egg wash helps achieve a shiny, deep golden crust.
- Waiting 2 hours before slicing allows the brioche interior to fully set.
Keywords: gluten free brioche, gluten free bread, easy brioche recipe, homemade brioche, gluten free baking, soft gluten free bread