Oreo Eyeball Truffles Recipe
“`html
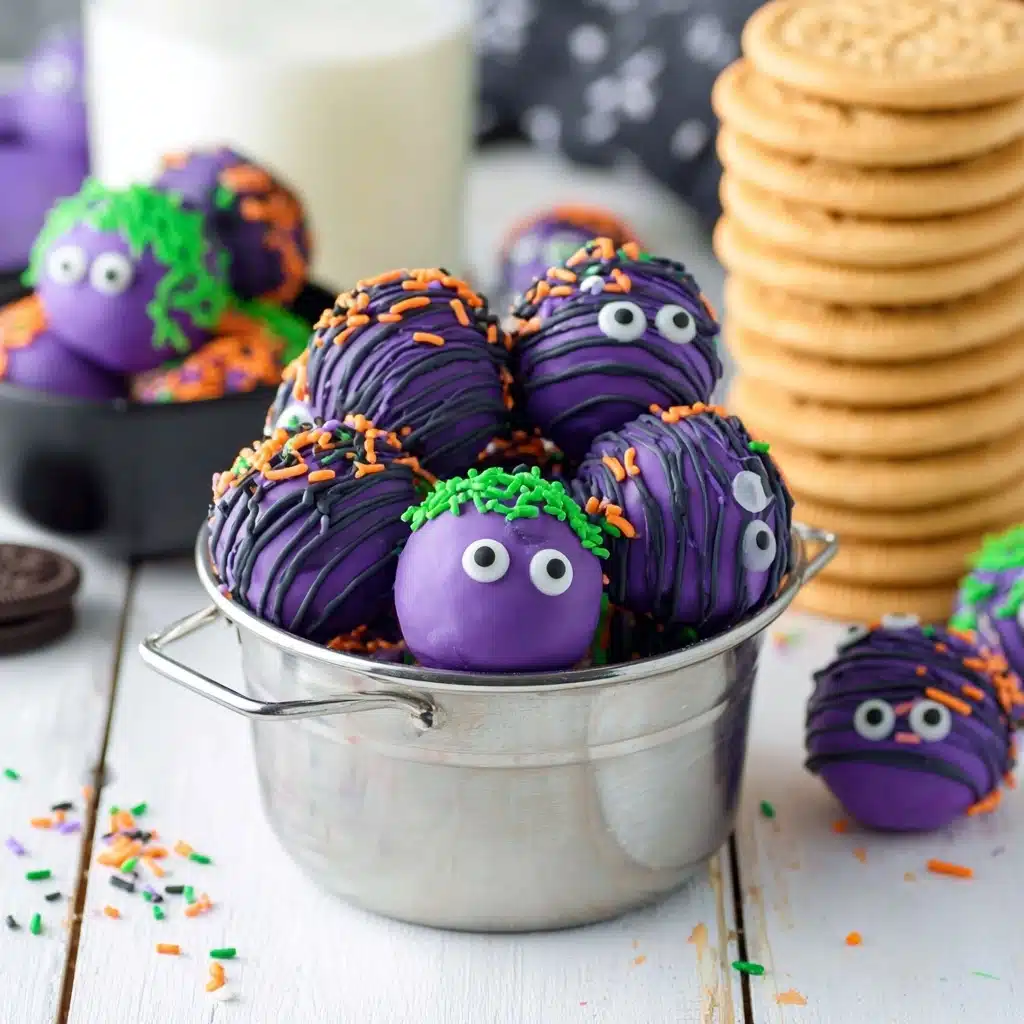
If you’re in the mood for a Halloween treat that’s as fun to make as it is to eat, these Oreo Eyeball Truffles are just the ticket. With their creamy, chocolatey center wrapped in colorful candy coating and topped with quirky candy eyes and sprinkles for “hair,” they bring a playful twist to a classic favorite. These Oreo Eyeball Truffles combine simple ingredients into an irresistibly spooky snack that’s perfect for parties or just sharing with friends who appreciate a sweet surprise.
Ingredients You’ll Need
Gathering the right ingredients is half the fun, and for Oreo Eyeball Truffles, each component plays an important role in crafting the perfect balance of flavor, texture, and visual appeal. From the crunch of golden Oreos to the creamy tang of cream cheese and the vibrant candy melts, every ingredient has a purpose.
- 19.1 ounces family-size package of golden Oreos: These give your truffles a wonderfully crunchy and sweet base that’s lighter than traditional chocolate Oreos.
- ¾ package (8-ounce) cream cheese (room temperature): This adds creamy smoothness and helps bind the crushed Oreos into truffle form.
- 12 ounce bag of colored candy melts: Perfect for coating your truffles in a vibrant, smooth shell that hardens just right.
- ½ cup color-matching sprinkles: These create “hair,” adding fun texture and visual interest to each eyeball truffle.
- 24 large candy eyes: The star decoration that brings your Oreo Eyeball Truffles to life with playful, spooky charm.
How to Make Oreo Eyeball Truffles
Step 1: Crush the Oreos
Begin by placing your golden Oreos into a food processor. Pulse them until they’re finely crumbled. Crushing them just right is key: you want crumbs small enough to blend well, but not so powdery that the texture disappears completely.
Step 2: Mix in Cream Cheese
Add the room temperature cream cheese to the crushed Oreos in the processor. Pulse again until the mixture is smooth and well combined. This step creates a creamy, moldable dough that’s the perfect consistency for rolling.
Step 3: Form the Truffle Balls
Use a 1 ½ tablespoon cookie scoop to portion out the dough evenly. Roll each scoop between your palms into a smooth ball. Aim for consistency in size so they bake and set evenly.
Step 4: Chill the Dough Balls
Line a large cookie sheet with parchment paper and arrange the truffle balls spaced apart. Pop them into the refrigerator for 15 to 30 minutes, or up to an hour. Chilling firms them up, which makes dipping easier and tidier.
Step 5: Melt the Candy Coating
When you’re ready to decorate, place your colored candy melts in a microwave-safe bowl. Heat for 45 seconds, then stir thoroughly. Continue heating in 10-20 second bursts, stirring after each, until the melts are silky smooth and ready for dipping.
Step 6: Dip and Decorate
Working in batches, dip each chilled truffle fully into the melted candy melts until coated. Use a fork to lift each truffle out, gently tapping off excess coating. Place them on clean parchment paper. Quickly press one candy eye onto the front of each truffle, then sprinkle the top with matching sprinkles to resemble “hair.”
Step 7: Set the Truffles
Once all the truffles are dipped and decorated, pop them back in the refrigerator for at least 30 minutes to let the candy coating harden completely. This ensures your Oreo Eyeball Truffles hold their shape and look irresistibly creepy.
How to Serve Oreo Eyeball Truffles

Garnishes
To add even more Halloween flair, consider adding a drizzle of contrasting candy melts over your Oreo Eyeball Truffles or sprinkling edible glitter for extra sparkle. Fresh mint leaves or small candy spiders are playful garnishes that enhance the spooky presentation without overpowering the treats.
Side Dishes
These truffles pair beautifully with a cool glass of milk or a warm cup of cinnamon-spiced hot chocolate. If you want to set up a whole Halloween dessert table, add some pumpkin-shaped sugar cookies or mini caramel apples for a delightful variety that keeps your guests coming back for more.
Creative Ways to Present
Serve your Oreo Eyeball Truffles in clear glass jars with cobweb decorations or arrange them on a black platter with a scattering of Halloween confetti. Wrapping each truffle in clear treat bags tied with festive ribbons makes them perfect for party favors or homemade gifts that wow.
Make Ahead and Storage
Storing Leftovers
If your Oreo Eyeball Truffles don’t all disappear at once (which can be rare), store the leftovers in an airtight container in the refrigerator. They’ll stay fresh and delicious for up to a week, maintaining their creamy centers and crisp candy shells.
Freezing
You can freeze these truffles by placing them in a single layer on a parchment-lined tray to freeze solid, then transferring them to a sealed freezer bag or container. Frozen Oreo Eyeball Truffles keep well for up to two months, making them a convenient treat to enjoy later.
Reheating
Because Oreo Eyeball Truffles are best enjoyed chilled, warming them is not recommended. Just allow frozen truffles to thaw in the fridge for a few hours before serving to preserve their perfect texture and look.
FAQs
Can I use regular Oreos instead of golden Oreos?
Absolutely! Regular Oreos work just fine and give the truffles a richer chocolate flavor, but golden Oreos provide a lighter color that makes the candy coating pop visually.
What if I don’t have a food processor?
You can crush the Oreos by placing them in a heavy-duty plastic bag and smashing with a rolling pin or even the bottom of a sturdy cup until finely crumbled. Just be patient to get a consistent texture.
Can I make these truffles dairy-free?
Yes! Use a dairy-free cream cheese substitute and dairy-free candy melts to make a vegan-friendly version of these delightful Oreo Eyeball Truffles without sacrificing flavor.
Is there an alternative to candy eyes?
If you can’t find candy eyes, you can pipe white chocolate circles and dot them with dark chocolate for homemade eyes, or substitute with small M&Ms or similar candies for a creative take.
How do I ensure smooth candy melt coating?
The key is to melt your candy melts slowly in short bursts, stirring frequently. Overheating can cause them to seize, so patience is critical for that perfect silky coating on your Oreo Eyeball Truffles.
Final Thoughts
There’s something truly magical about transforming simple Oreo cookies into these playful Oreo Eyeball Truffles that captivate both kids and adults alike. Whether you’re making them for a festive gathering or just craving a fun project that ends with a tasty treat, these truffles bring excitement and smiles with every bite. I encourage you to gather your ingredients, embrace your creative side, and enjoy the deliciously spooky fun of Oreo Eyeball Truffles!
“`
PrintOreo Eyeball Truffles Recipe

These Oreo Eyeball Truffles are a spooky and delicious Halloween treat featuring golden Oreo crumbs mixed with cream cheese, dipped in colorful candy melts, and decorated with candy eyes and sprinkles to mimic eerie eyeballs.
- Prep Time: 15 minutes
- Cook Time: 15 minutes (melting and dipping)
- Total Time: 45 minutes to 1 hour (including chilling times)
- Yield: 24 truffles 1x
- Category: Dessert, Snack
- Method: No-bake, dipping
- Cuisine: American
- Diet: Vegetarian
Ingredients
Truffle Base
- 19.1 ounces family-size package of golden Oreos
- ¾ (8-ounce) package cream cheese, room temperature
Decorations
- 12-ounce bag colored candy melts
- ½ cup color-matching sprinkles
- 24 large candy eyes
Instructions
- Crush the Oreos: Place the golden Oreos in a food processor and crush until they are finely crumbled, ensuring a uniform texture for the truffle base.
- Combine with Cream Cheese: Add the room temperature cream cheese to the crushed Oreos and pulse the mixture in the food processor until well combined, forming a dough-like consistency.
- Shape Truffles: Using a 1½ tablespoon cookie scoop, portion out the mixture and roll each portion into smooth balls with your hands.
- Chill the Truffles: Arrange the truffle balls on a parchment-lined baking sheet and refrigerate for 15 to 30 minutes, or up to an hour, to set firmly.
- Prepare Candy Melt Coating: Heat the candy melts in a medium microwave-safe bowl in 45-second intervals, stirring well each time. Continue heating in 10 to 20 second increments until the candy melt is completely smooth.
- Dip the Truffles: Working in batches, dip each chilled truffle into the melted candy until fully coated, allowing excess coating to drip off, then place on a clean parchment-lined surface.
- Decorate: While the candy coating is still wet, press a large candy eye onto the front of each truffle. Sprinkle the tops with the color-matching sprinkles to resemble creepy hair.
- Set the Coating: Allow the decorated truffles to set by refrigerating for at least 30 minutes or until the candy coating hardens completely.
Notes
- Room temperature cream cheese is essential for easy blending with the Oreo crumbs.
- Use a variety of candy melt colors and matching sprinkles for creative variations.
- Store truffles in an airtight container in the refrigerator for up to one week.
- For easier dipping, thin the candy melts with a teaspoon of vegetable oil if they become too thick.
- If you don’t have a food processor, place Oreos in a sealed plastic bag and crush with a rolling pin before mixing manually with cream cheese.
Nutrition
- Serving Size: 1 truffle (approx. 25g)
- Calories: 110
- Sugar: 10g
- Sodium: 55mg
- Fat: 6g
- Saturated Fat: 3.5g
- Unsaturated Fat: 1.5g
- Trans Fat: 0g
- Carbohydrates: 14g
- Fiber: 0.5g
- Protein: 1g
- Cholesterol: 10mg
Keywords: Oreo truffles, Halloween treats, candy melts, no-bake dessert, spooky snacks, golden Oreo recipes, easy truffles